 Skip to content

The Hanakoko Guide
The Hanakoko Guide
So glad your order made it to you. Quick video answers to everything — how to apply, size, remove and care — plus a little thank-you gift from us.
How can we help?
Pick your product, then tap a question.
💅 Press-On Nails
How to apply press-on nails?
Proper prep is key! Start by gently buffing your nails, pushing back cuticles, and wiping away all oil and dust.
When applying, use the 45-degree angle trick: slide the nail tip under your cuticle at a 45-degree angle from the top down.
This squeezes out all air bubbles, allowing the press-on to sit seamlessly under the cuticle line just like a salon acrylic.
Press and hold firmly from all angles for 15 seconds.
 ▶
Watch tutorial on YouTube →
▶
Watch tutorial on YouTube →
How to remove press-on nails?
Soak your hands in warm water (adding a bit of soap or cuticle oil helps loosen the grip). Use the included wooden stick to gently lift the edges.
Slowly move along the cuticle line from both sides until the nail lifts off completely. Never force or rip them off.
Roll the wooden stick to remove any leftover adhesive from your natural nails and the press-on tips so you can save them for next time!
 ▶
Watch tutorial on YouTube →
▶
Watch tutorial on YouTube →
How to choose size for press-on nails?
Use a soft measuring tape or wrap a piece of paper around the widest part of your nail bed, then mark the edges and measure with a ruler.
Match your measurements in millimeters (mm) to our sizing chart to find your perfect fit (XS/S/M/L).
 ▶
Watch tutorial on YouTube →
▶
Watch tutorial on YouTube →
Adjust C-curve-What if I have flat nails? I feel my press-ons are too small
If you have flat nails, the tips may feel tight. You can gently press down on the center of the press-on to flatten its C-curve slightly before applying.
Alternatively, using a hair dryer to warm and soften the tip for 10-20 seconds or resting it on a hot water cup can help you flatten and reshape it effortlessly.
 ▶
Watch tutorial on YouTube →
▶
Watch tutorial on YouTube →
Adjust C-curve-What if I have curved nails?I feel my press-ons are too big?
To fill the gap (or "valley") under curved nails, simply layer or stack your adhesive tabs. You can flip any excess adhesive tab over or patch the middle with a small, cut piece of adhesive to build up height.
This eliminates gaps, prevents air/water bubbles, and makes your application last much longer.
 ▶
Watch tutorial on YouTube →
▶
Watch tutorial on YouTube →
How long do they last?
With adhesive tabs, they last 3-7 days (perfect for temporary wear and reusable nails). With proper prep and nail glue, they can last up to 2-3 weeks.
 ▶
Watch tutorial on YouTube →
▶
Watch tutorial on YouTube →
Can I customize my size/length/shape?
Yes! We offer four main popular shapes—Square, Coffin, Almond, and Oval—in varying lengths ranging from short (15mm) to long (30mm).
You can easily select your size and write down your preferred custom shape on the product page for a small customization fee.
 ▶
Watch tutorial on YouTube →
▶
Watch tutorial on YouTube →
Can I make my own design?
Yes, for fully custom designs, you can upload your images through the link here: custom press-ons page Please specify your size, shape and other details.
Custom sets take around a week to make depending on the complexity of the design. Custom sets cannot be returned or refunded.
We will try our best to make the sets as close to your wish as possible, but we cannnot guarantee 100% exact sameness.
 ▶
Watch tutorial on YouTube →
▶
Watch tutorial on YouTube →
What's your difference from $2 drugstore nails?
Unlike flimsy drugstore options, our premium nails feature a durable, natural-looking structure with thicker tips and thinner cuticles for ultimate comfort, longevity, and a salon-quality finish.
 ▶
Watch tutorial on YouTube →
▶
Watch tutorial on YouTube →
Do's and don'ts
Do: Buff nails gently, wipe away oil completely, "slide in" cuticles at 45 degrees angle and hold for 15s.
Don't: Touch water within 2 hours of application, or force nails off during removal.
 ▶
Watch tutorial on YouTube →
▶
Watch tutorial on YouTube →
👁️ Press-On Lashes
How to apply upper lashes correctly?
- Curl natural lashes and ensure they are clean.
- Gently place the lash cluster underneath your natural lashes, about 1mm away from the waterline.
- Press together to secure.
 ▶
Watch tutorial on YouTube →
▶
Watch tutorial on YouTube →
How to apply bottom lashes correctly?
- Look slightly upward to fully expose your lower lash line.
- Align the cluster with the base of your natural bottom lashes, angling it slightly inward at 45 degrees, then press gently to secure.
- Apply the clusters one by one, spacing them evenly to achieve a naturally enlarged, doll-like eye effect.
 ▶
Watch tutorial on YouTube →
▶
Watch tutorial on YouTube →
How to remove the lashes?
Gently push your lashes downward so the false lash separates from your natural lashes, then lightly pull the band away — it comes off easily.
Don't yank the lash or peel the band off forcefully.
How long can these stay on? Are they waterproof? Can I sleep with them on?
They're comfortable to wear all day long. They hold up to everyday water — a little rain or happy tears are no problem — but they're not made for swimming, surfing or diving.
We don't recommend sleeping in them. For the best fit and the longest life, treat them as a one-day wear: on in the morning, off before bed.
That keeps the band and curl in perfect shape for your next wear.
Are they reusable ? If yes, how many times ?
Yes, they are designed for multiple uses! If your eye makeup is light and your eyelids aren't overly oily, the self-adhesive gel strip will remain clear and sticky after removal, making them good as new.
However, heavy eye makeup or powder smudges can cloud the gel and reduce stickiness. With proper care, a single pair can typically be reused 3 to 5 times.
 ▶
Watch tutorial on YouTube →
▶
Watch tutorial on YouTube →
Why my lashes don't stick/ they don't last long?
This is usually due to the application process rather than the product. Make sure to avoid these common mistakes:
Incomplete Curling: If your natural lashes are straight or soft, they can push the press-ons off. Use a wide-angle curler or a lash primer to keep them lifted before application.
Oily Surface: Any leftover oil, water, or skincare residue on your lashes will weaken the adhesive. Always clean and dry your lashes first.
Wrong Placement: Ensure the cluster is attached to the underside of your natural lashes, right near the roots, rather than on top of the lashes or directly on the eyelid skin.
Tip: Give the clusters a gentle tug after applying to make sure they are fully secured.
 ▶
Watch tutorial on YouTube →
▶
Watch tutorial on YouTube →
Why are my press-on lash clusters drooping, sticking to my eyelids, or showing a shiny band?
This usually happens due to application technique rather than the lashes themselves. To get a secure, natural look with your glueless press-on lashes, follow these steps:
- Prep your lashes: Start by cleaning your natural lashes. Since eyelashes naturally grow downward, make sure to curl them first. If you have very fine lashes, a small amount of lash primer can provide extra grip.
-
Perfect your placement: Using a pair of tweezers, grab the lash cluster at its base. Pull your eyelid upward slightly so you can clearly see your natural lash line.
Too low: the cluster will poke your eye.
Too high: the lash band will be visible and shiny.
Just right: place the cluster exactly where your natural lashes meet your eyelid. - Press firmly: Once placed, use your tweezers to firmly press the lash band into your lash line. A gentle placement will leave the band visible, but a firm press will make it blend in and become completely invisible.
- Follow your eye shape: Apply each cluster right up against the previous one without leaving any gaps or placing them at weird angles. This ensures a seamless, natural look from every angle.
 ▶
Watch tutorial on YouTube →
▶
Watch tutorial on YouTube →
What length and curl are these styles?
The info can be found in the detailed description on the product page.
Does it come with the tool to apply?
Only our Lux version comes with tweezers included. Our other styles don't come with an applicator tool.
No worries though — you can apply them perfectly well with just your fingers. If you'd like a tool, you can add tweezers separately tweezers and you might also love our reverse tweezers reverse tweezers made to make lash application even easier.
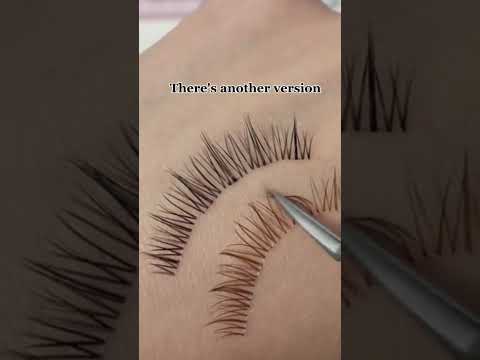
Do you have these in brown?
Yes,some of our deigns have black and brown options. You can check all brown styles here:all brown styles here
 ▶
Watch tutorial on YouTube →
▶
Watch tutorial on YouTube →
What is the lash adhesive made of?
The main ingredients of our lash adhesive are: thermoplastic elastomer (SIS), hydrocarbon resin, rosin-based resin, mineral oil, and a small amount of antioxidant.
If you have sensitive skin or known allergies — rosin (colophony) in particular is a common sensitivity — we recommend a small patch test on your inner arm before use, and stop using if any irritation occurs.
🖊️ Eyeliner & Tools
What's left and right of the eyeliner stamp?
You'll find "Left" and "Right" printed on the two ends. They simply refer to your own left and right eyes.
Just match it to the matching eye and stamp following that shape.
Why is the eyeliner stamp dried?
If it dries out after use, it's almost always because a cap wasn't sealed tightly. Be sure to close both caps firmly every time you finish using it.
If it arrived dry on your very first use, it may have been exposed to extreme heat or cold during shipping. Please reach out to our support team at official@hanakoko.com and we'll send you a replacement.
💬 Other FAQs
Is there any extra duty or tax fee?
The price you see at checkout is the full amount we charge — there are no hidden fees from us, and most orders arrive with nothing extra to pay.
Occasionally, local customs may apply a small import fee based on your country's regulations. That's determined and collected by your local authorities, not by us. If that ever happens and you have questions, just email us — we're happy to help.
Where are the products made?
Nails: Our press-on nails are handcrafted at our partner studios across Asia — primarily in China, Japan, Vietnam, and Thailand.
Lashes: Our lashes are crafted in China, using premium materials — such as lash fibers and adhesives — sourced mainly from South Korea and Germany.
Every set passes our own quality inspection before it ships to you.
Do you have an offline store?
We currently don't have an offline retail store, but we look forward to seeing you in person very soon. Let us know where you are and we'll be there someday.
Show us your look,
get 15% off
- Post your Hanakoko set on social media and tag @hanakoko_official
- DM us, or email us, a screenshot of your post
- We'll send you a 15% off code for your next order 💌
One code per order · valid on your next purchase at hanakoko.com
Still need a hand?
We reply within 24 hours on business days.
Include your order number (starts with #) so we can help faster.